Welcome!

Welcome to Eat Well, Backpackers!

The blog page contains all information in no particular order. Use these links to find what you need. This is a work in progress. A lot of information needs to be added yet.

Blog     General How-To    Recipe Index     Menus- Breakfast    Menus- Cold Meals    Menus- Hot Meals    Menus- Snacks    Product Reviews    Packaging   

Creating this blog is my ultimate decision for how to handle the ongoing interest in how I have prepared food for backpacking over the years. For a long time my thinking was stuck on the idea of a book, but this topic is too dynamic for that rigid of a format. On the other hand, I didn't want to provide all this information completely free of charge.
Therefore, this blog will have advertisements showing. You are free to ignore them or not. They do help me in a small way.
I collect no information from visitors to this page.

Thursday, September 13, 2018

Packaging Small Square Crackers in Boxes


Packaging Tip

Yes, a small box will add maybe two-tenths of an ounce of weight, but it's not much fun if you've planned to have crackers and dip and you only have a pile of cracker crumbs after they've spent four days in your pack. This tiny bit of care at home is well worth it.

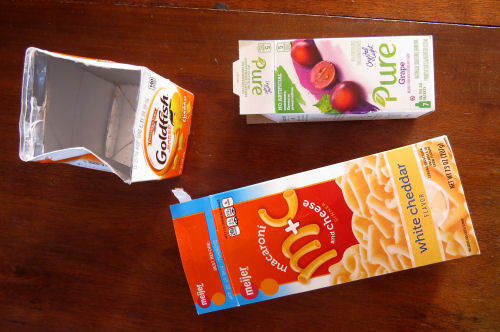
This tip works with small rectangular or square crackers such as Cheese-It, Town House flatbreads, Chicken-In-A-Biscuit, Triscuits, etc. Any cracker about 1" x 1.5" can be kept safe this way. You just have to find a box with a narrow dimension that matches one side of the cracker.

Examples of potentially useful boxes
 small cardboard boxes

At Home:

As you are preparing food, don't throw away or break down boxes with narrow bases or other potentially useful shapes until all your food is packaged. Pudding boxes are a good size, too. Fill the box with crackers- one or two rows, depending on how many crackers you need. But do fill each row. You don't want room for the crackers to shift and jostle. If you really don't want to fill a row, stuff the empty space with a wad of wax paper or plastic bag or something.

One completely filled row of flatbread crackers in a lined box
crackers re-packaged in a small cardboard box

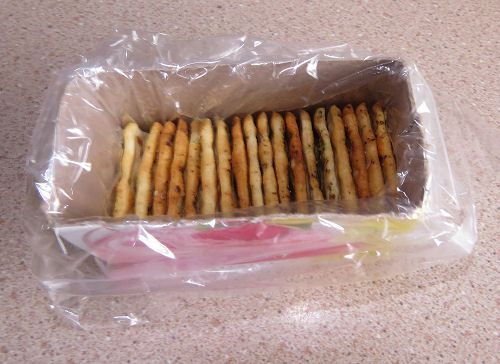
Line the box with a cheap bit of plastic- saran wrap, a fold-over sandwich bag, even wax paper-- just something to keep the crackers clean and add a bit of padding.

crackers re-packaged in a small cardboard box

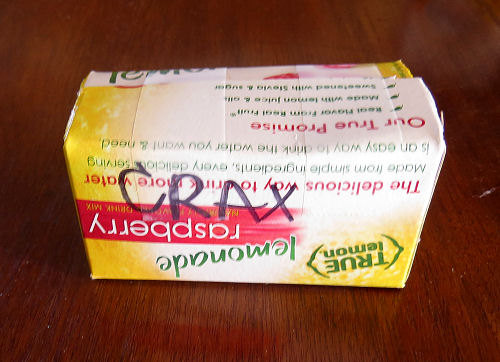
Cut off the top of the bag, cut off extra height on the box, cut down the corners to the level of the crackers. Tape shut and label.

In Camp:

Open and eat. You will seldom have broken crackers if you do this! Carry out all trash!

if you like this blog, click the +1   or

Like This!

Wednesday, September 12, 2018

Pizza Bowl


Hot Meal

Medium weight, very filling, adaptable, easier with 2 pans

pizza bowl backpacking hot meal

See How to Dry Onions
See How to Dry Meat

Cooking before packaging - none
Dehydrate before packaging - sauce, hamburger
Cooking in camp - boiling water and simmer

At Home:
This recipe is 2 main dish servings

Mix together:
8 oz pizza sauce
1/3 c. cream of mushroom soup, undiluted
one small chopped onion
spread this on saran wrap about 1/4 inch thick and let dry to leather

Package in a bag:
4 oz. pasta- elbow macaroni or small rigatoni is good

Dehydrate:
1/4 to 1/2 pound ground beef or sausage
when thoroughly dry, package in a separate bag

When sauce leather is dry, package it with 12 slices of pepperoni cut into small chunks

You now have 3 bags of ingredients. You also need 2 oz of mozzarella cheese (string cheese keeps well, or you may have a block of mozzarella in the lunch bag)

Add a small slip of paper with the in-camp directions. You will thank yourself later.

In Camp:

If you only have one pan, boil the pasta first, drain and put it in your bowl so you can re-use the pan
boil 2 c. water, add the dried meat and simmer until it is reconstituted
Add the sauce mix to the meat and simmer until smooth and hot
Mix the sauce and meat with the pasta
Cut up the mozzarella into small bits on top and let it melt a bit.

You probably won't have a breakable bowl in camp, but this is what it looks like made up
pizza bowl backpacking hot meal

You can add pretty much anything you like on pizza to this. Cut up and dehydrate bits of green pepper, olives, pineapple, etc. If you like bacon on pizza I suggest using fake bacon bits because the real ones can go rancid.

if you like this blog, click the +1   or

Like This!

Tuesday, September 11, 2018

Date Nut Logs


Snack/ Dessert

Really delicious with no valueless filler ingredients, they are not too messy but are a bit sticky

date nut logs


Cooking before packaging - yes
Dehydrate before packaging - none
Cooking in camp - none

At Home:
This recipe makes 8- 12 logs- you determine the size you want

1.
Toast the oatmeal and nuts in a jelly roll pan or cake pan. About 375° for 10 minutes. You just want them lightly brown- they will brown a bit more after removed from oven so don't overdo it.

1 1/2 c. oatmeal
1 c. nuts (sliced almonds, walnut bits, pecan bits, etc)

2.
Chop 1 c (220g) dates till the pieces are smaller than raisins. You can also use a food processor for this if you have one.

3.
Melt together 1/4 c. smooth peanut (or almond) butter and 1/4 c. honey.

4.
Mix all ingredients together and combine thoroughly. You can add other things like crushed banana chips, other fruits, etc. Chocolate chips do not travel well on summer trips, but mini-M&Ms might be OK. You may need to increase the honey and peanut butter to bind things if you add a lot of extra ingredients.

5.
Make into logs or balls, and place in individual bags


In Camp:

Open the bag and eat!

if you like this blog, click the +1   or

Like This!

How to Dry Meat


General How-To

Provides protein and texture in the diet

1/2 pound of dehydrated hamburger
dehydrated hamburger

The two important things about drying meats for use in meal packets are 1) to remove as much fat as possible and 2) make the pieces small.

At Home:

Canned meats:

Canned meats work very well to dehydrate because they have been cooked to the point that they are very tender. It is important to choose water pack instead of oil pack where there is a choice to reduce the amount of fat. Fat is your enemy in drying foods because it prevents good dehydration and will go rancid.

1. Drain the meat thoroughly
2. Spread in a thin layer on paper towels in the dehydrator
3. Dry thoroughly- crumbles should be hard, not leathery

Examples:
water pack tuna
water pack salmon
chicken
potted meat spreads
canned stew (if you shred the chunks of meat)

dehydrated water-pack tuna
dehydrated tuna

Ground meats:

Ground meats can be successfully dehydrated by this method:
1. Fry the meat, breaking up the meat into small crumbles
2. Drain the fat
3. Place meat in a colander with small holes and run hot water through it for several minutes
4. Pat the meat dry with paper towels
5. Spread in a thin layer on paper towels in the dehydrator
6. Dry thoroughly- crumbles should be hard, not leathery
7. Change the toweling if a lot of additional grease has been pulled out of the meat (usually required when doing sausage)

Examples:
hamburger
venison burger (works well because there is so little fat in the meat)
ground sausage

sausage, cooked, drained and rinsed, spread in dehydrator
dehydrated hamburger

sausage partially dehydrated, requiring a paper change. Note the grease that has soaked into the paper towel
dehydrated hamburger

Cooked shredded meats:

Meats can be pre-cooked until very tender and shredded before dehydrating. As always, the pieces must be small for even drying and good reconstitution.

Examples:
pulled pork
chicken
turkey

In Camp:
Boil water and reconstitute the meat before adding other ingredients because the meat takes a little longer to soften than vegetable leathers and other possible meal parts. Alternatively, you can add a little water to the meat pack a few hours before the meal and let it sit. Be aware that dried meat crumbles/shreds can poke small holes in storage bags. If you are going to add water and carry the meat in your pack to reconstitute, you probably should double bag to prevent gear being soaked with meat juice.

if you like this blog, click the +1   or

Like This!

Monday, September 10, 2018

Veggie Plops


Side Dish, Salad

Very lightweight, surprisingly satisfying

These provide vegetables and dairy in a crunchy format. You could even break them up on purpose to sprinkle on mashed potatoes or soup.

Veggie Plops

See How to Dehydrate Liquids

Cooking before packaging - none
Dehydrate before packaging - yes
Cooking in camp - none

At Home:
This recipe makes 50-60 plops

Combine 1 cup LOWFAT or FAT FREE cottage cheese with flavoring in a blender or the container of an immersion blender. Blend until nearly smooth and the consistency of a thick milkshake. Add liquid a little at a time so you don't get it too thin.

Veggie Plops

Drop and spread in plops about 1 to 1.5 inches across on saran wrap. Dehydrate till crisp.

Veggie Plops

Flavor suggestions- each is with 1 c. cottage cheese:

My personal favorites:
Pickle- use pickle juice and some cut up pieces of pickle
V-8- add enough V-8 to get the desired consistency

Others I have tried:
Italian Spinach- 3 oz. raw spinach, 1/2 t. Italian seasoning, a little milk
Tomato Chili- 1 large tomato, 1/4 t. chili powder
Salsa- add salsa to get the desired consistency
Green Pepper- 1 green pepper, 1 T. dried parsley, 1 T. chives
Cottage Garden- 1 carrot, 1 T. dried parsley, 2 radishes, 1 stalk green onion (these weren't as good as I expected)
Spaghetti- 1 T. parmesan cheese, spaghetti sauce to get the desired consistency
Lemon Cuke- 1 peeled cucumber 1/2 lemon including juice and zest (these were very bland)

Invent your own!

Package 10 or more in a snack bag for one serving. They are more filling than you would expect.


In Camp:
eat right from the bag

if you like this blog, click the +1   or

Like This!

Product Review- Molly McButter


Product Review

Molly McButter is a powdered butter product that can add flavor to dried meals. Because dried foods need to be low fat (fat will go rancid), this product restores some of the taste that fat provides.

Molly McButter

I recently was unable to get Butter Buds and have tried Molly McButter. It comes in a sprinkle-top jar and is about $2.00 for 2 oz.

Things I Do Like:

The texture and flavor are good.

It combines well with dry ingredients.

It is the least expensive of these products.

Things I Don't Like:

It may form clumps when rehydrating.

The package says it must be refrigerated after opening. I have not tested this.

Other Products in This Line:
Butter Buds in foil packets

Ingredients:

Maltodextrin, salt, butter, tricalcium phosphate, whey, nonfat dry milk, natural flavor, sunflower oil, annato, tumeric, modified corn starch, silicon dioxide

Alternatives:

Butter Buds

Other bulk Butter Powders (I have not tried other products, and most come in a large container)

if you like this blog, click the +1   or

Like This!

Product Review- Butter Buds


Product Review

Butter Buds are a powdered butter product that can add flavor to dried meals. Because dried foods need to be low fat (fat will go rancid), this product restores some of the taste that fat provides.

Butter Buds

Butter Buds have been my favorite butter substitute for years, but if I'm honest, I can't tell much taste difference from other similar products. They are generally found in a sprinkle-top jar, about 2.5 oz for around $3.00

Things I Do Like:

The texture and flavor are good.

It combines well with dry ingredients and doesn't form clumps when rehydrating.

There is no problem with loss of flavor or spoilage.

Does not require refrigeration

Things I Don't Like:

Butter Buds can occasionally be hard to find without ordering.

Other Products in This Line:
Butter Buds in foil packets

Ingredients:

Maltodextrin, butter, salt, natural butter flavor, rice starch, soybean lecethin, annato, tumeric

Alternatives:

Molly McButter (contains milk products and must be refrigerated after opening)

Other bulk Butter Powders (I have not tried other products, and most come in a large container)

if you like this blog, click the +1   or

Like This!

Product Review- Dang Coconut Chips


Product Review

Coconut chips make a nice addition to fruit mixes and some salads. Here's my opinion of Dang Toasted Coconut Chips- Original

Dang Coconut Chips

These coconut chips are toasted, so they are slightly brown. I am using them because they were less work and less waste than making my own, but I don't really like them very much.

Things I Do Like:

The size and shape are good. The texture and size of flaked coconut doesn't work well in fruit mixes.

It wasn't outrageously expensive. This 3.17 oz bag was $2.50 and contains about a cup of chips

Things I Don't Like:

There is added sugar and salt. These aren't really necessary, and they are very sweet.

I don't like that they are toasted golden brown. There would be more coconut flavor if they weren't so crisp.

Other Products in This Line:
Lightly Salted Coconut Chips
Caramel Sea Salt Coconut Chips
Chocolate Sea Salt Coconut Chips

Ingredients:

Coconut, cane sugar, salt.


Alternatives:

When I have the time, I prefer to buy a fresh coconut and use a vegetable peeler to peel off flakes of the white flesh. These can be dehydrated, but they don't keep very well. I once got violently ill on some spoiled coconut that I'd kept too long.

Organic food stores may carry dried coconut "flakes," which are about this size. These are often sweetened, too, but not toasted.

if you like this blog, click the +1   or

Like This!

Tuesday, September 4, 2018

Tuna Rice Curry


Hot Meal

Medium weight, moderately easy to prepare, filling

2 servings of tuna- ready to dehydrate
tuna ready to dehydrate

See How to Dry Meats

Cooking before packaging - none
Dehydrate before packaging - tuna
Cooking in camp - boil water and simmer or let sit

At Home:
This recipe is for one serving

Dehydrate one 4 oz. can of WATER PACKED tuna per serving. Do yourself a favor and get better quality white albacore tuna. The cheap tuna tastes really fishy when dried.

Package in one baggie, size depending on how many you are feeding:
the dehydrated tuna

Package in another baggie, size depending on how many you are feeding:
1/2 c. instant rice (white or brown, although brown takes longer to cook and doesn't ever really get soft)
3 T. powdered milk

Package in another baggie-- I like to seal the spices in a scrap of sandwich bag.
1/2 t salt
1 t. curry powder

Add a small slip of paper with the in-camp directions. You will thank yourself later.

the packets for tuna-rice curry
tuna rice curry hot meal

In Camp:
Make a paste of the spices and a little water.
Add the spices and tuna to 1 c. water for each serving and boil
Add the rice and milk, cover simmer for 6-8 minutes or remove from heat and let it sit covered for 8-10 minutes
Fluff and if the rice is done it's ready to eat.

if you like this blog, click the +1   or

Like This!

Monday, September 3, 2018

Red Sox Salad


It's red and it will knock your sox off!
Salad, lightweight, different and refreshing

red sox backpacking salad

See How to Dry Citruis Fruits
See How to Dry Finely Cut or Small Things

Cooking before packaging - must cook beets
Cooking in camp - none

At Home:
This recipe is 1 average serving (increase cabbage or beets if desired

Wash and cook beets until soft but not mushy. Cool.

Dehydrate per serving:
Use one 3-4 oz. beet (about 3.5 oz dried). Grate on large grater or julienne slice- picture is grated beets before drying
Use a 1 1/2 inch wedge of a 5" diameter head of red carrot. Slice thinly (about 3 oz raw or 1.5 oz dried)
1 tangerine (or other tart orangy thing like a Clementine, or minneola)

photo of grated beets:
grated beets

Package in a baggie, sandwich to quart size, depending on how many you are feeding:
the beet shreds
the cabbage shreds
the citrus fruit pulled from the rind and possibly cut into smaller pieces if desired
package separately, 1 t. sugar-included lemonade mix (I seal this into a small piece of a sandwich bag)

red sox salad ingredients

Add a small slip of paper with the in-camp directions. You will thank yourself later.

In Camp:
Remove the lemon pack from the baggie. Add about 1/4 c. water per serving and allow to rehydrate. If you can remember to do this a couple hours before the meal, great. If not, just knead it a little when you add the water and it will be OK. Just before eating sprinkle on the lemonade mix.

if you like this blog, click the +1   or

Like This!

Sunday, September 2, 2018

Easy Gravy Potatoes


Hot Meal

Very lightweight, very quick to prepare, surprisingly satisfying

easy gravy potatoes backpacking hot meal

See How to Dry Herbs
See How to Dry Onions

Cooking before packaging - none
Cooking in camp - boiling water

At Home:
This recipe is 3 main dish servings

Package in a baggie, sandwich to quart size, depending on how many you are feeding:

1 1/2 cup instant mashed potatoes
1/3 cup powdered milk
6 T. Butter buds
1 T. dried parsley flakes
1 T. dried onion bits
1/2 t salt
pepper
3/4 of a powdered brown gravy packet (these usually are around 0.9 oz foil packets. Use less or more depending on how strong you want the gravy flavor)
1/2 cup bacon bits (you can use real bacon, but you will need to use the meal within about a week or the bacon goes rancid. Fake bacon bits keep better).

Add a small slip of paper with the in-camp directions. You will thank yourself later.

easy gravy potatoes backpacking hot meal

In Camp:
boil 1 c. water for each serving (eg. for the recipe above you would boil 3 c. water).
Add the mix, remove from heat, stir and let it sit a few minutes. Stir again to fluff and serve. Add a little more water if too dry.

if you like this blog, click the +1   or

Like This!


Easy Cheesy Potatoes


Hot Meal

Very lightweight, very quick to prepare, surprisingly satisfying

easy cheesy potatoes backpacking hot meal

See How to Dry Herbs
See How to Dry Onions

Cooking before packaging - none
Cooking in camp - boiling water

At Home:
This recipe is 3 main dish servings

Package in a baggie, sandwich to quart size, depending on how many you are feeding:

1 1/2 cup instant mashed potatoes
1/3 cup powdered milk
6 T. Butter buds
1 T. dried parsley flakes
1 T. dried onion bits
1/2 t salt
pepper
1 powdered cheese packet from a cheap box of macaroni and cheese
1/2 cup bacon bits (you can use real bacon, but you will need to use the meal within about a week or the bacon goes rancid. Fake bacon bits keep better).

Add a small slip of paper with the in-camp directions. You will thank yourself later.

In Camp:
boil 1 c. water for each serving (eg. for the recipe above you would boil 3 c. water).
Add the mix, remove from heat, stir and let it sit a few minutes. Stir again to fluff and serve. Add a little more water if too dry.

if you like this blog, click the +1   or

Like This!


Saturday, September 1, 2018

How to Dry Yogurt

This is a general how-to page. The information here applies to all recipes that call for dried yogurt.

Dry only low-fat yogurt. Commercial or homemade yogurt works fine.

In the past I tried dehydrating thick slabs of leathery yogurt to be eaten like candy. They tasted great but were very difficult to chew. Now, I suggest spreading the yogurt a little thinner, about 1/4 inch thick, on saran wrap or teflon.


yogurt ready to be dehydrated

When this is dry it will come off in flakes rather than a slab, but the pieces rehydrate easily in the mouth. Shown here packaged with dried fruit, ready to eat.

yogurt and fruit backpacking breakfast


if you like this blog, click the +1   or

Like This!